
")
Shopify popups are important for changing browsers into patrons. You should utilize both native instruments or apps to create popups that seize emails, promote gross sales, and cut back cart abandonment — plus, you possibly can add them to your retailer without cost.
Acceptable popup focusing on turns these interruptions into useful moments. Present welcome reductions to new guests, delivery provides at checkout, or win-back offers to previous clients to make them really feel like pure extensions of your purchasing expertise.
Be part of us beneath to grasp popup creation, focusing on, and optimization in your Shopify retailer.
Create Shopify popups that convert with Omnisend
Fast enroll | No bank card required
3 strategies so as to add Shopify popups
Need popups in your Shopify retailer? You’ve bought three routes — apps that deal with all the pieces, Shopify’s built-in software, or writing code your self:
1. Third-party popup apps
So as to add a Shopify popup, head to the Shopify App Retailer and also you’ll discover Omnisend, Privy, OptiMonk, Justuno, Poptin, Wisepops, and about 50 different apps competing in your consideration.
Most work the identical manner — set up, choose a template, customise colours to match your model, and publish. The basic variations present in triggers and focusing on.
Exit-intent catches abandoning guests, scroll share waits till they’re engaged, and time delays stop annoying rapid popups. Higher apps phase by location, gadget, or previous purchases — displaying completely different provides to first-time guests versus returning clients.
Anticipate to pay $20–100 month-to-month for first rate options. Free variations exist, however restrict impressions or add watermarks.
Professionals
- Skilled designs and templates prepared to make use of
- Superior focusing on and set off choices
- Constructed-in analytics and A/B testing
- No coding information required
Cons
- Month-to-month subscription charges add up
- One other third-party service to handle
- Restricted customization inside app constraints
2. Shopify Types app
Shopify quietly launched Types as its reply to popup apps. You’ll find it in your admin below Advertising > Shopify Types. No set up wanted — it’s already there.
The templates cowl fundamentals — e-mail signups, low cost codes, and age verification. Decide one, modify the textual content, and alter button colours. That’s about it for personalization. Your captured emails circulation straight into Shopify’s buyer listing and are prepared for e-mail campaigns.
Lacking options change into apparent quick. No exit popups, no A/B assessments, no “present after scrolling 50%” choices. However zero price and 0 setup complexity make it excellent for testing whether or not popups work in your retailer.
Professionals
- Fully free with Shopify
- Direct integration with Shopify
- Easy setup in minutes
- No exterior accounts wanted
Cons
- Fundamental templates solely
- No superior triggers or focusing on
- Restricted design customization
- No efficiency analytics
3. Customized code implementation
Open your theme editor, create a brand new snippet referred to as popup.liquid, and begin coding. You management each pixel, each animation, each situation for show.
JavaScript handles the logic — localStorage tracks if somebody already noticed your Shopify e-mail popup, setTimeout controls delays, and occasion listeners look ahead to exit intent.
CSS positions all the pieces and provides transitions. Liquid pulls in dynamic content material like product names or buyer tags.
The educational curve is critical if you happen to’re not already snug with code. One misplaced bracket breaks your total retailer. Plus, you’re debugging throughout browsers, fixing cellular layouts, and updating all the pieces when Shopify adjustments its structure.
However you’ll by no means pay app charges or hit function partitions. Your popup does what you program it to do.
Professionals
- Full management over design and performance
- No recurring charges
- Combine with any system
- Construct distinctive options that apps don’t provide
Cons
- Requires coding information
- Time-intensive to construct and keep
- You deal with all debugging
- Threat of breaking your retailer
Technique 1: Including popups with Omnisend
Omnisend’s kind builder creates popups, embedded varieties, flyouts, and touchdown pages from the identical interface. You’ll discover templates for e-mail assortment, SMS seize, cart abandonment prevention, and product suggestions.
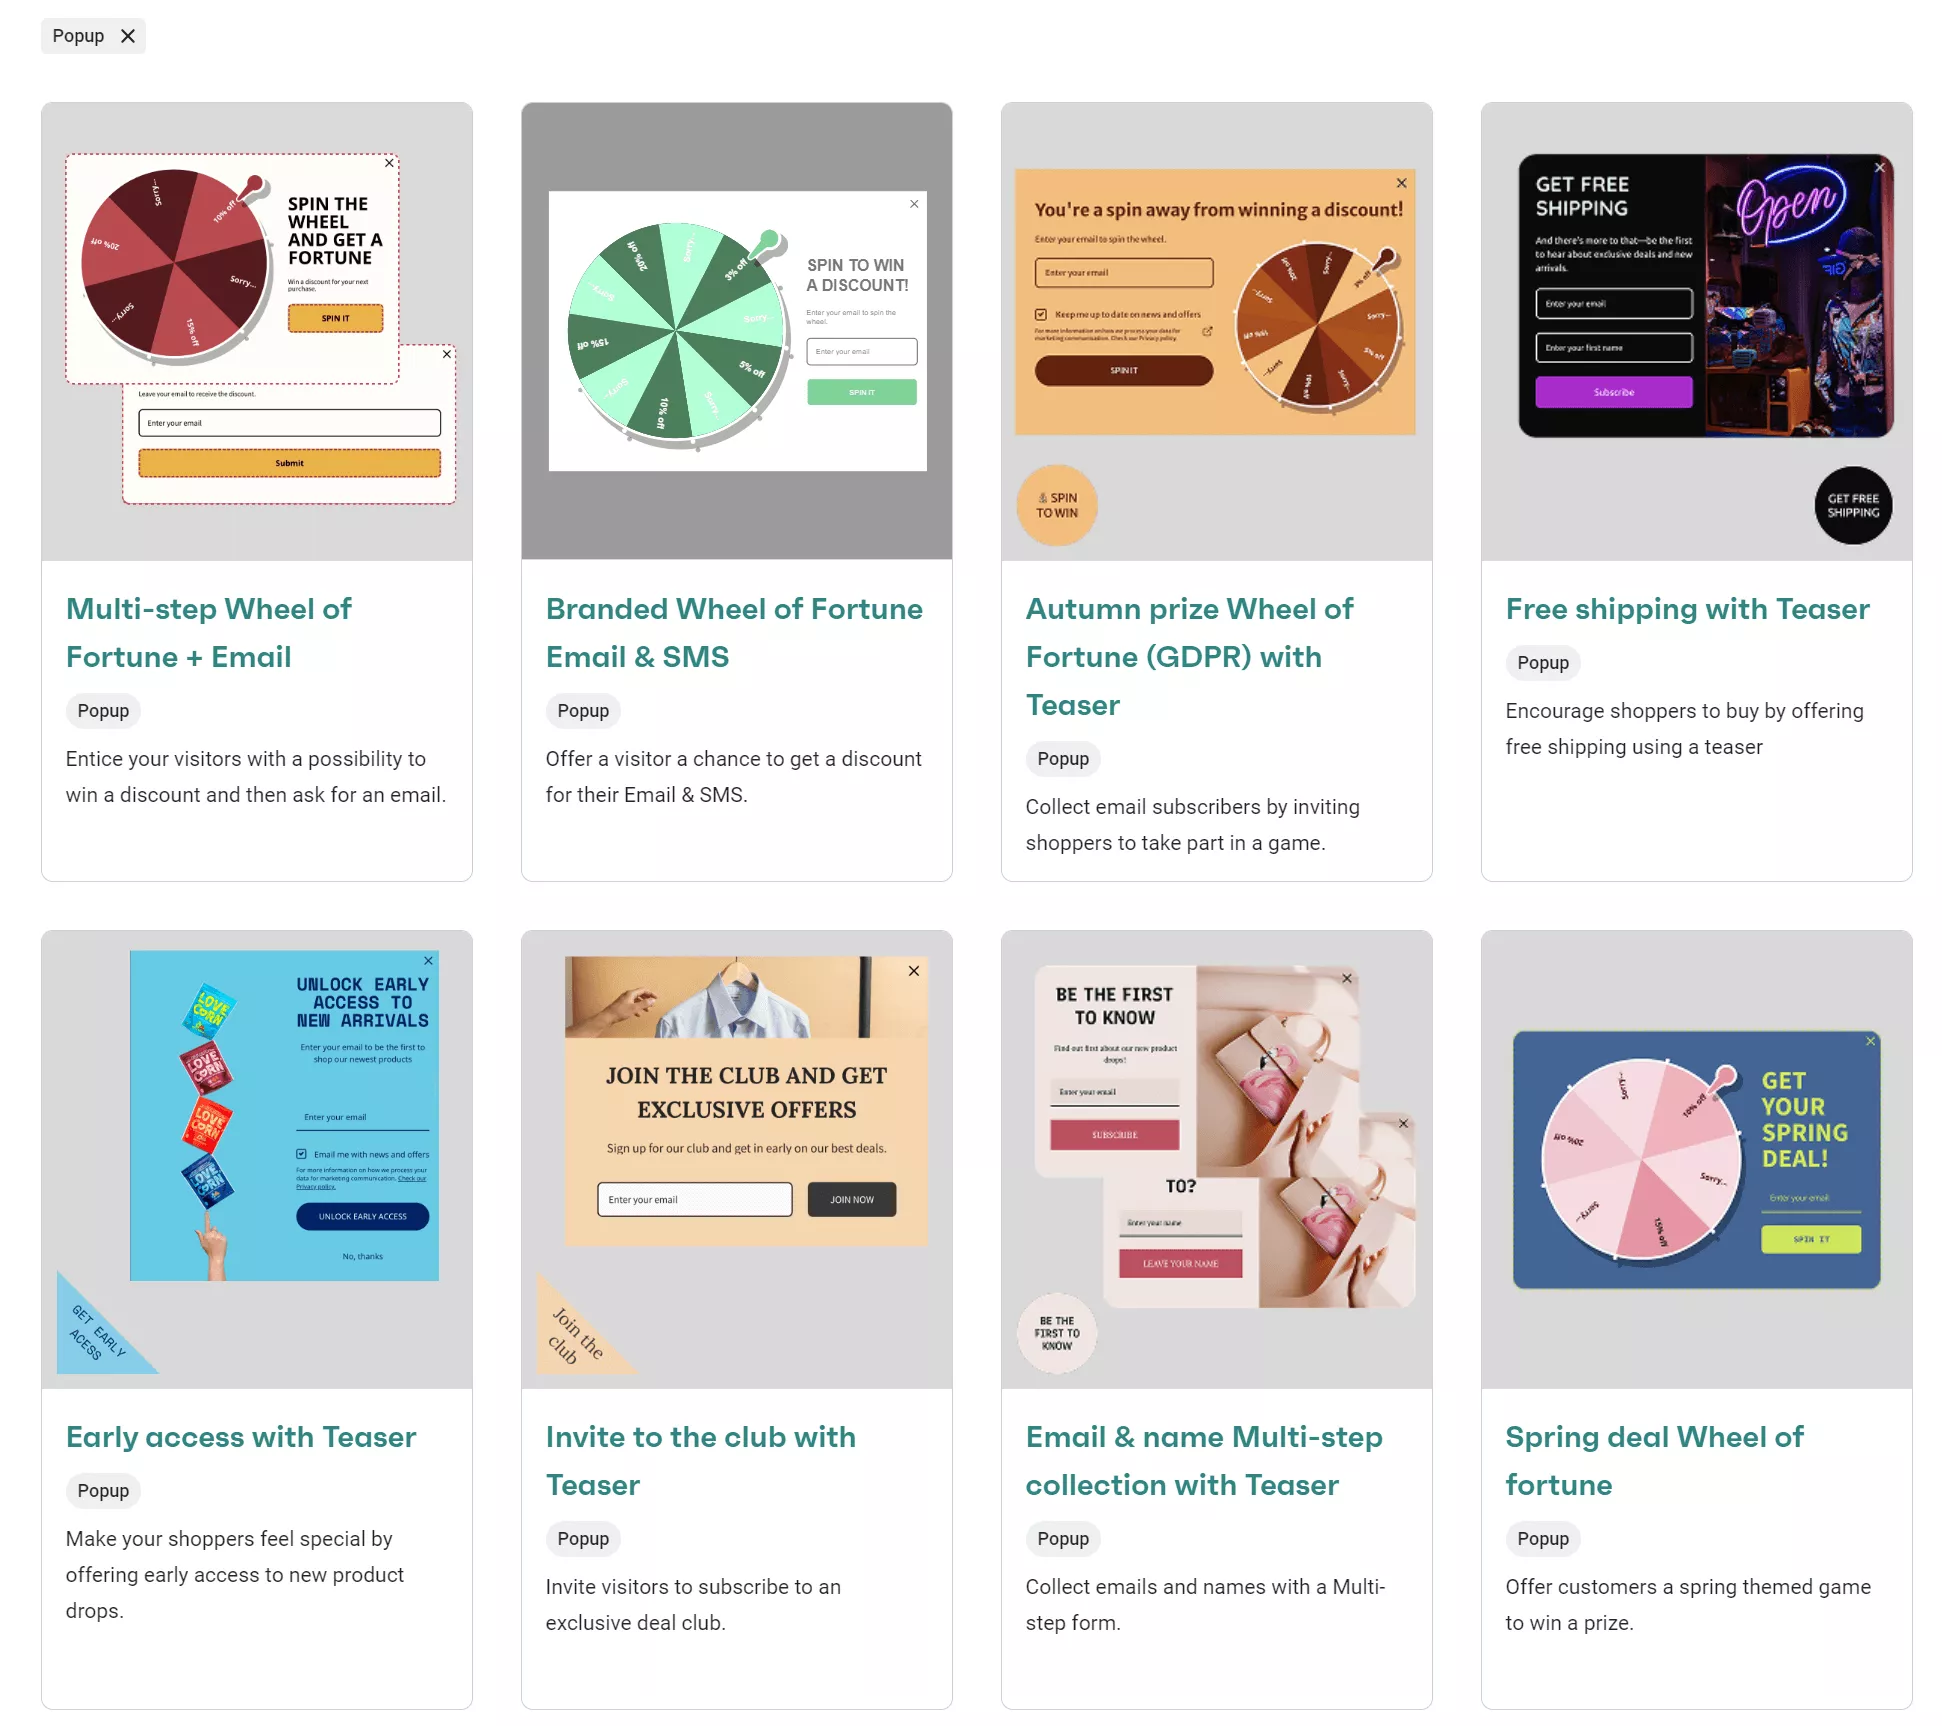
Common popup varieties embody:
- Wheel of Fortune gamified popups — Guests spin for reductions and are rewarded for participation, equivalent to on this instance:
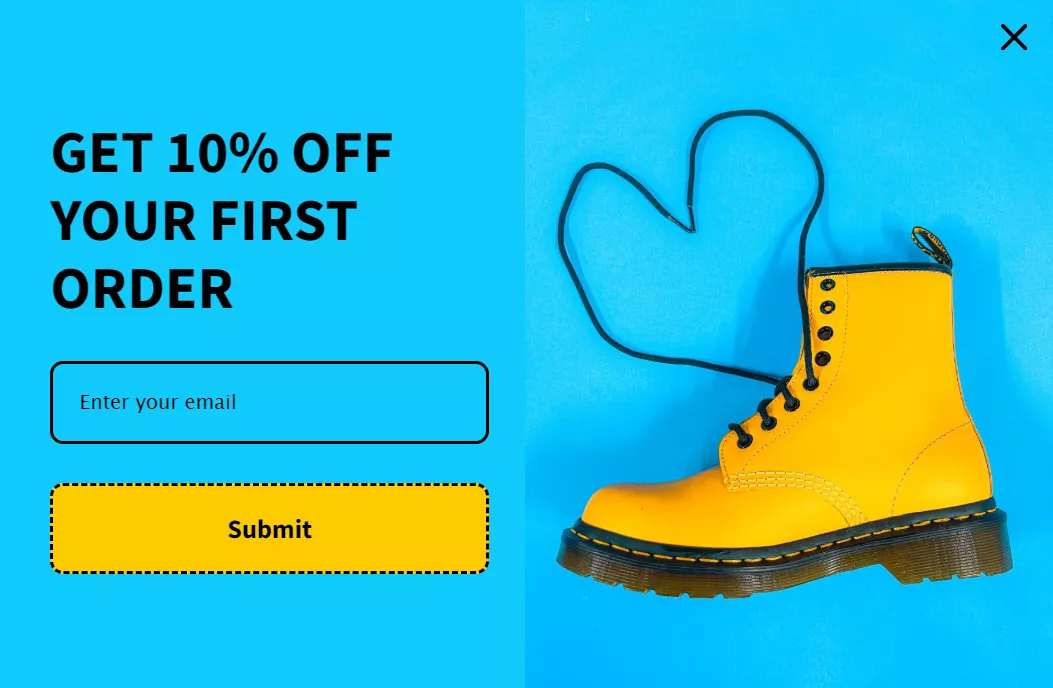
- Multi-step varieties — Ask “Save in your buy” first, then acquire emails after the micro-yes, like this:
Step 1
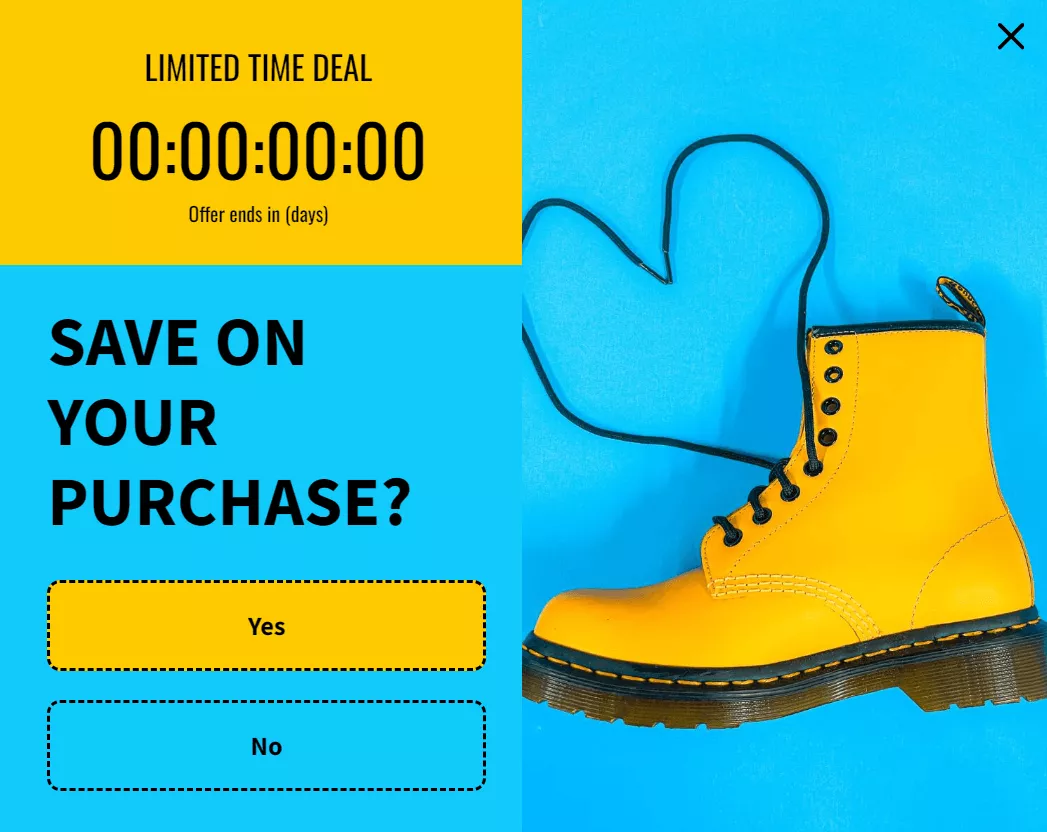
Step 2
- Teaser varieties — Delicate tabs at display edges that broaden when clicked
- Birthday collectors — Collect dates for automated reward campaigns year-round
- Choice surveys — Fast questions like “Store males’s or ladies’s?” for fast segmentation
Triggering choices vary from exit-intent (monitoring mouse actions towards shut buttons) to scroll share and time delays. You management when popups seem — after 30 seconds shopping, midway down product pages, or when carts hit $50.
Omnisend’s Shopify certification brings one-click set up and computerized low cost code technology — no duplicate codes on coupon websites, no handbook imports.
Kind submissions circulation instantly into e-mail workflows, triggering a welcome sequence based mostly on which popup guests accomplished.
Right here’s add popups on Shopify with Omnisend:
Be aware: Should you’d reasonably watch a video than learn our tutorial, right here’s our walkthrough information:
1. Entry the shape builder
Navigate to Types > Create kind > Type > Popup in your Omnisend dashboard.
Decide a template from the Types library — you’ll see choices for Shopify e-newsletter popups for signups, promotional provides, gamification wheels, and seasonal designs:
Right here’s a screenshot of Omnisend’s template library:
Clicking a template opens the Kind Builder interface.
2. Customise the design format
Click on Theme settings to manage your popup’s look. You’ll find Theme settings within the high proper sidebar beneath the Allow kind button:
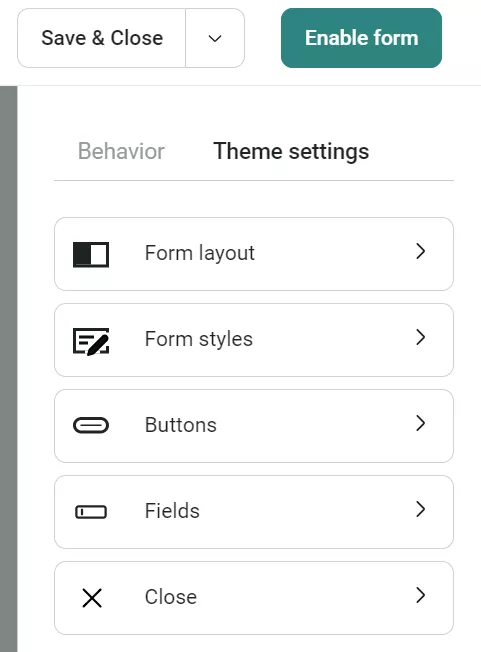
Beneath Kind format, set the shape width (300–1000px default vary), select picture placement (left, proper, high, or background), and modify padding.
The Fields part enables you to customise enter shapes, whereas Buttons controls world button styling — border kinds, nook rounding, and colours.
3. Construct your kind content material
Drag gadgets from the left sidebar onto your kind. Accessible blocks embody:
- E-mail subject — Add placeholder textual content, make required, customise error messages
- Cellphone subject — Choose default nation, reveals as flag + nation code
- Authorized block — Required for GDPR/TCPA compliance with privateness coverage hyperlinks
- Photographs — JPG, PNG, or GIF codecs below 2000px dimensions
- Dropdown — Gather gender, nation, or {custom} properties
Right here’s a picture displaying all accessible Gadgets:
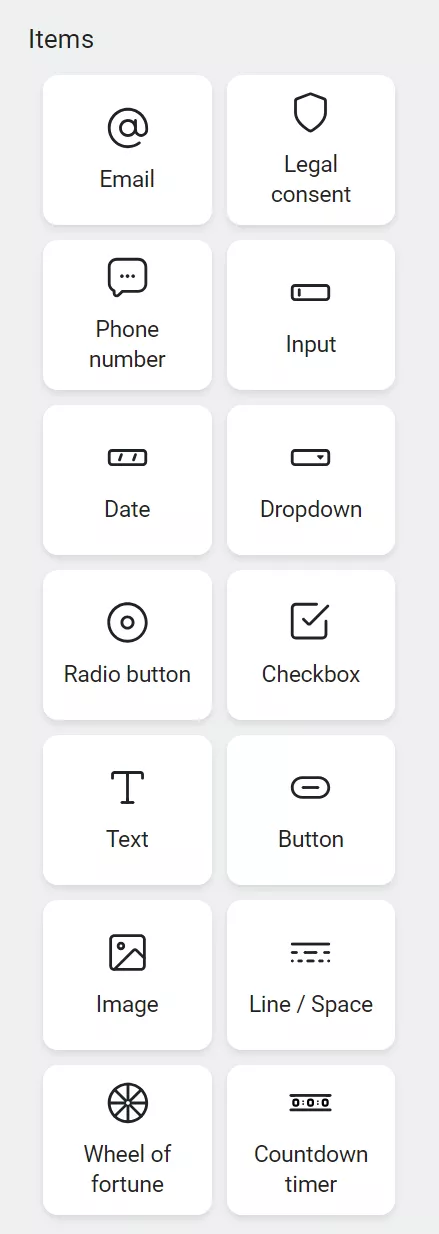
Click on any block to entry its settings — modify textual content, styling, and subject necessities.
4. Configure show triggers
Open the Habits tab, situated subsequent to Theme settings, to set show guidelines:
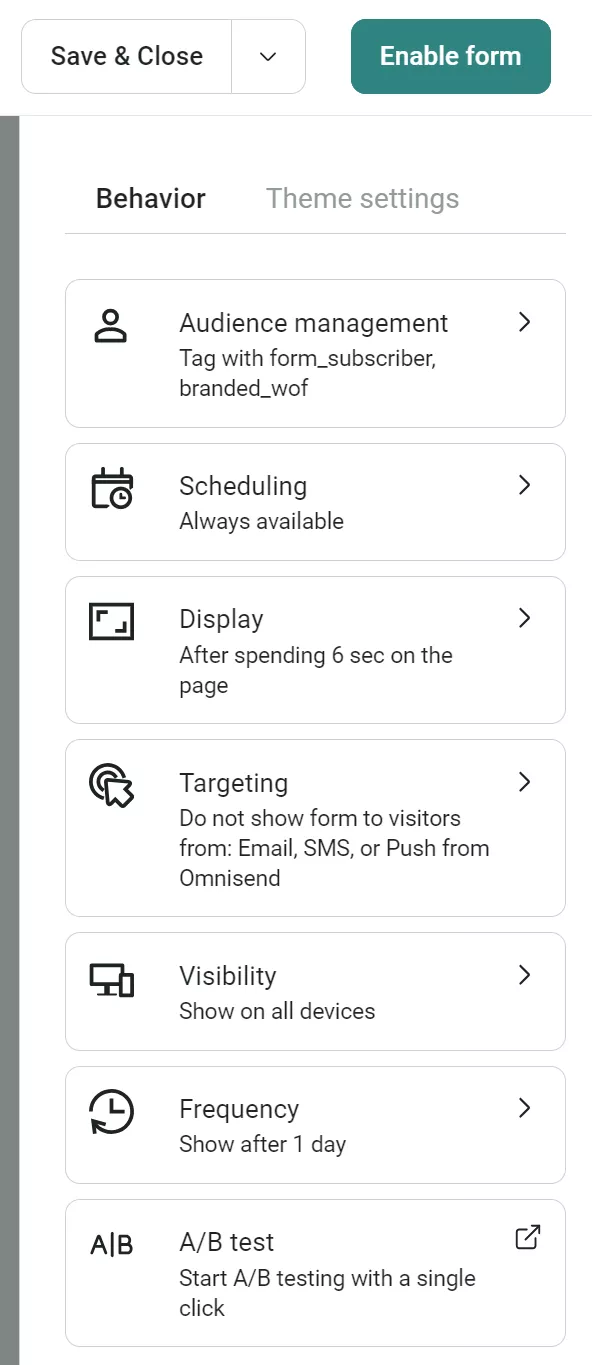
- Web page visits — Set the variety of pages seen earlier than the popup seems
- Time on web page — Delay in seconds earlier than displaying
- Scroll depth — Share of web page scrolled
- Exit intent — Triggers on speedy upward scrolling (works on all gadgets)
A number of guidelines join with OR logic — the popup reveals when any single situation is met.
5. Goal particular audiences
The Concentrating on part within the Habits tab controls who sees your popup and the place it seems:
Customer focusing on choices:
- All guests — Present to everybody
- Don’t present to current contacts — Goal new guests solely
- Present to current contacts — Show unique provides to subscribers
- Goal by particular phase — Embody or exclude {custom} segments
Web page focusing on choices:
- Seems on URL — Show on particular pages or UTM parameters
- Doesn’t seem on URL — Exclude sure pages
- Seems on out-of-stock product pages — Particular set off for stock
Be aware: Web page focusing on makes use of AND logic, which means all URL circumstances should match for the popup to show.
6. Set reappearance frequency
In Frequency settings, select intervals:
If disabled, the shape all the time seems to guests. Allow frequency limits to keep away from overwhelming retailer guests and lowering the standard of your consumer expertise.
7. Create success messages
Click on Success within the backside menu. Edit the success message like the principle kind — add textual content, pictures, buttons, or promotional content material. Right here’s an instance:
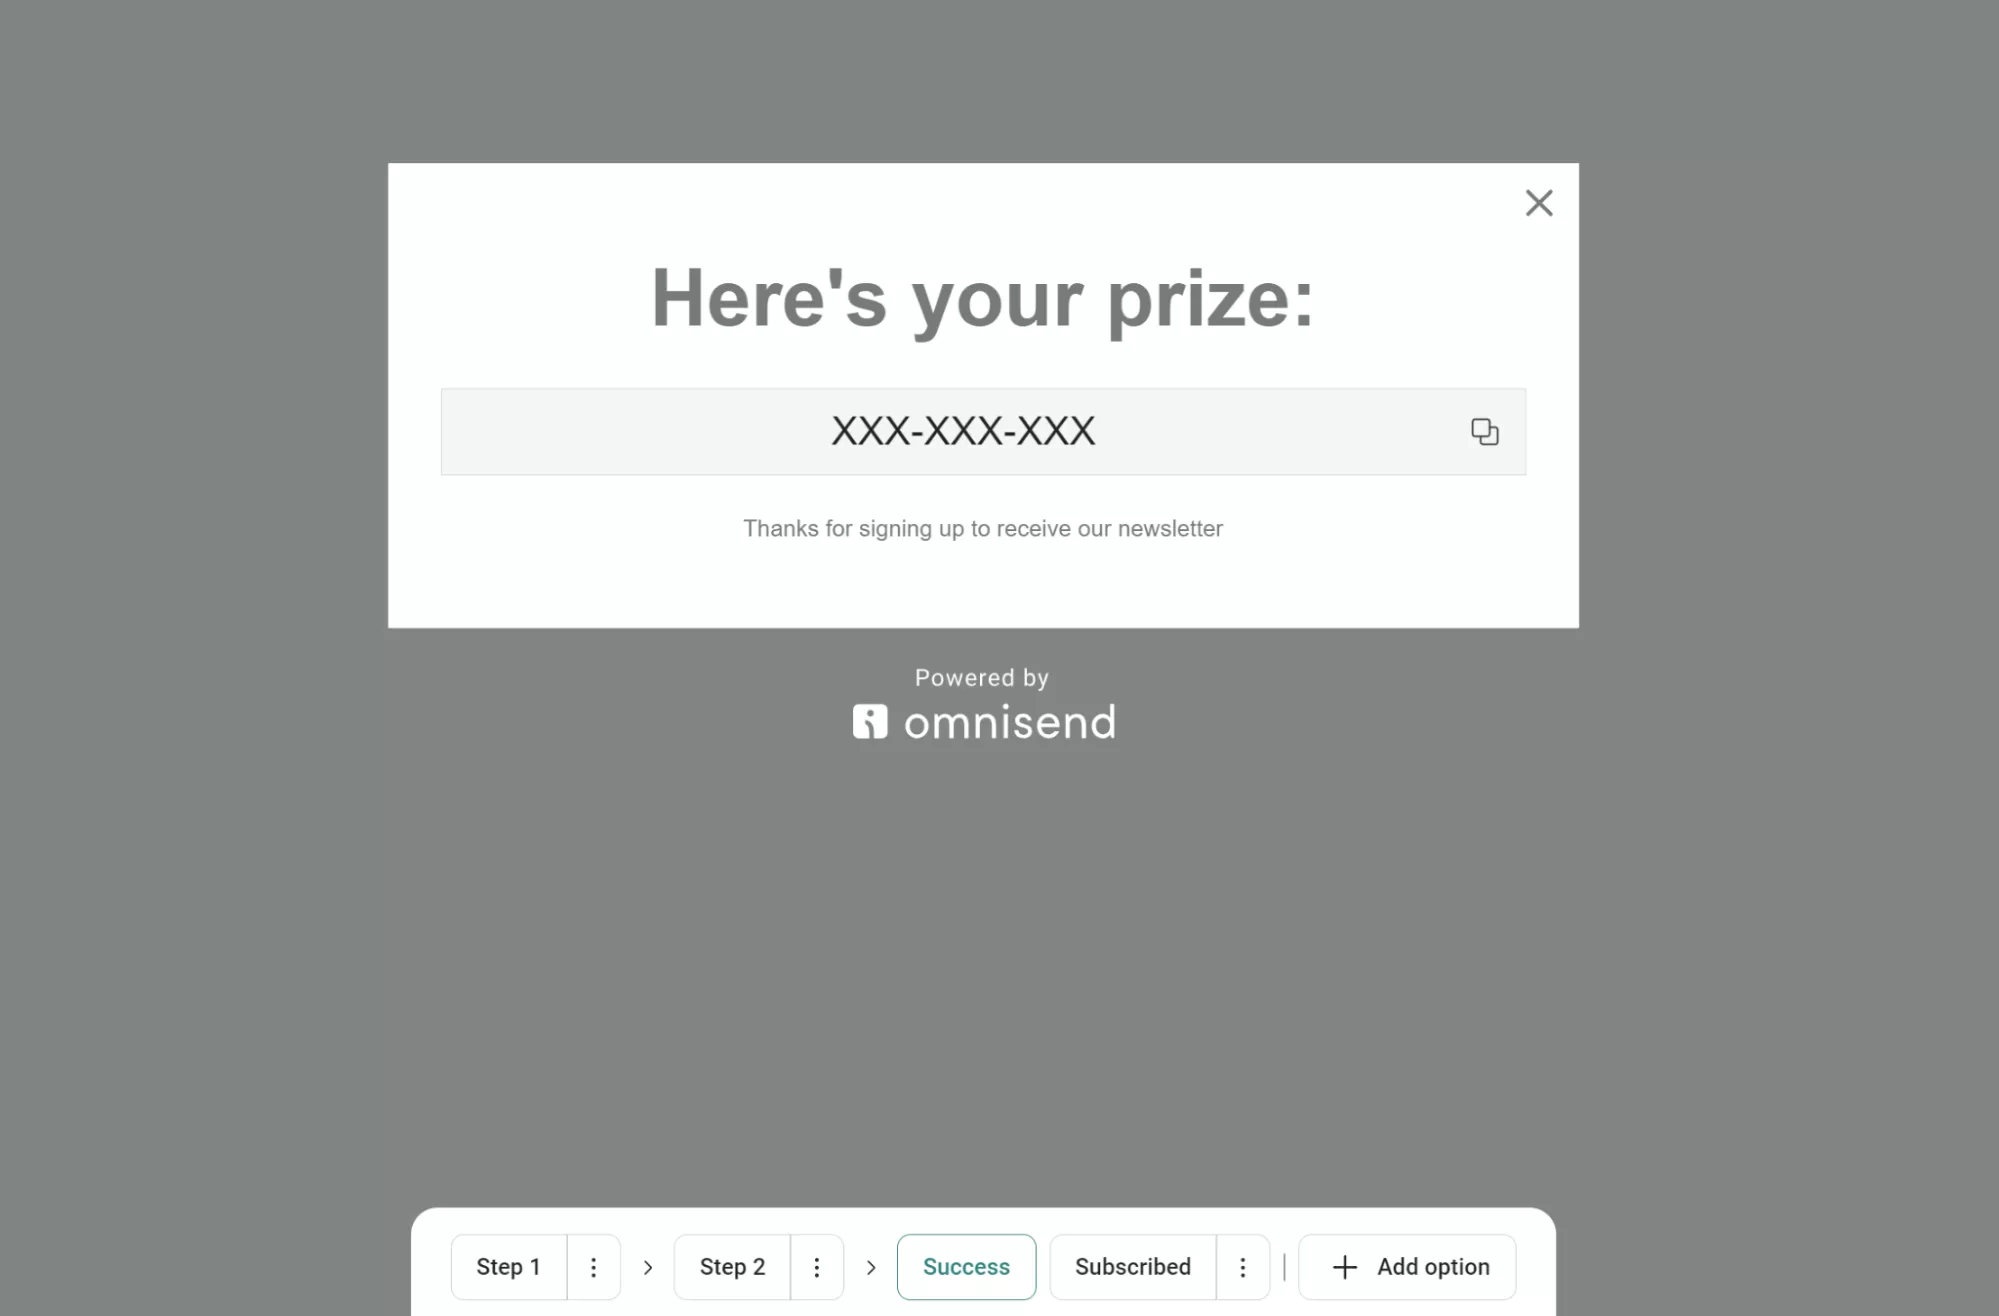
Use the Subscribed part to create a separate message for returning subscribers who’re already in your listing. For example:

8. Allow A/B testing (elective)
Toggle A/B take a look at in Habits settings to experiment with completely different popup variations. Clicking A/B take a look at will load this web page:
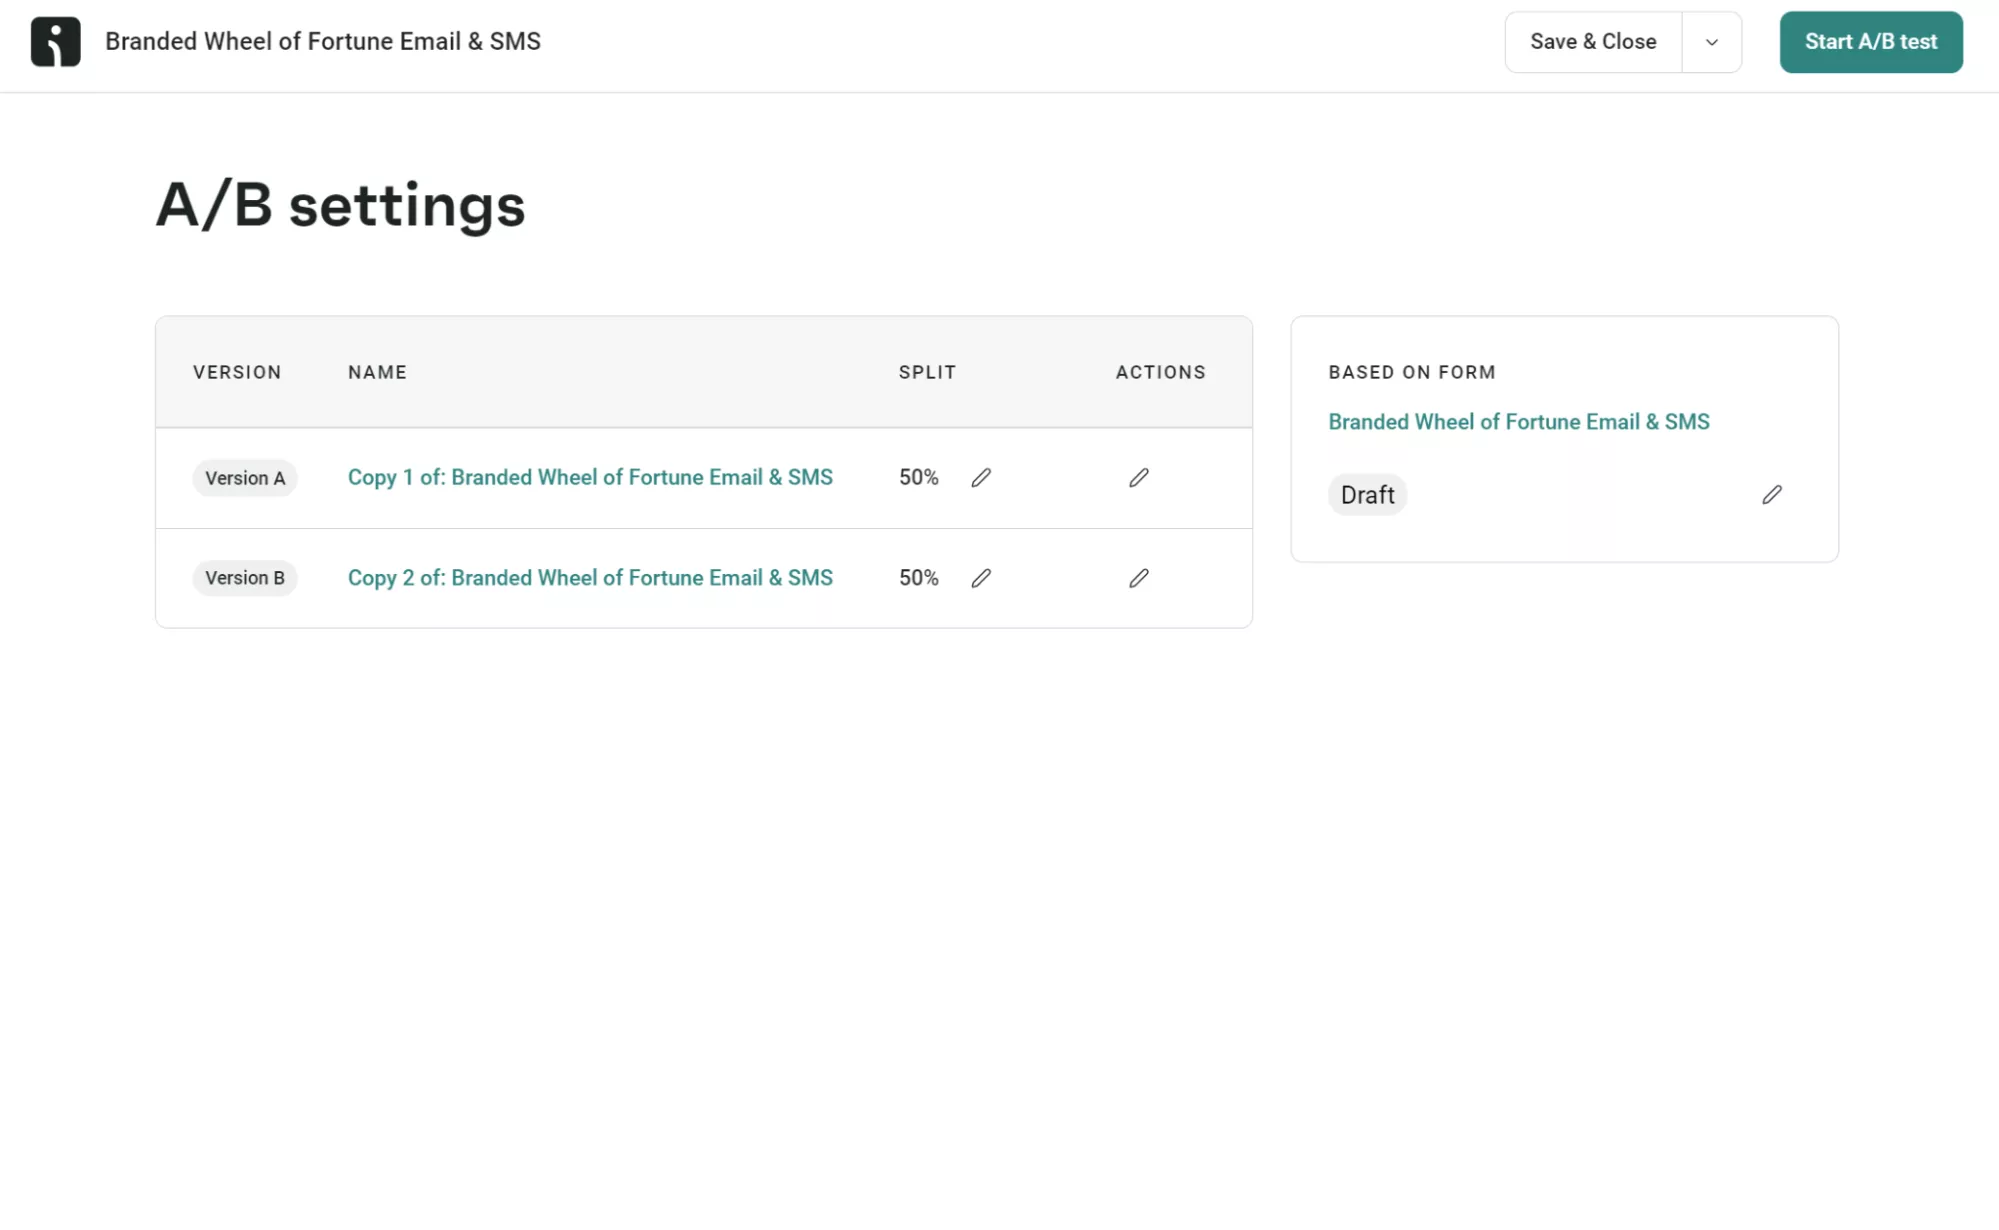
It’s finest observe to check variations of content material, timing, or design to optimize efficiency.
9. Preview and activate
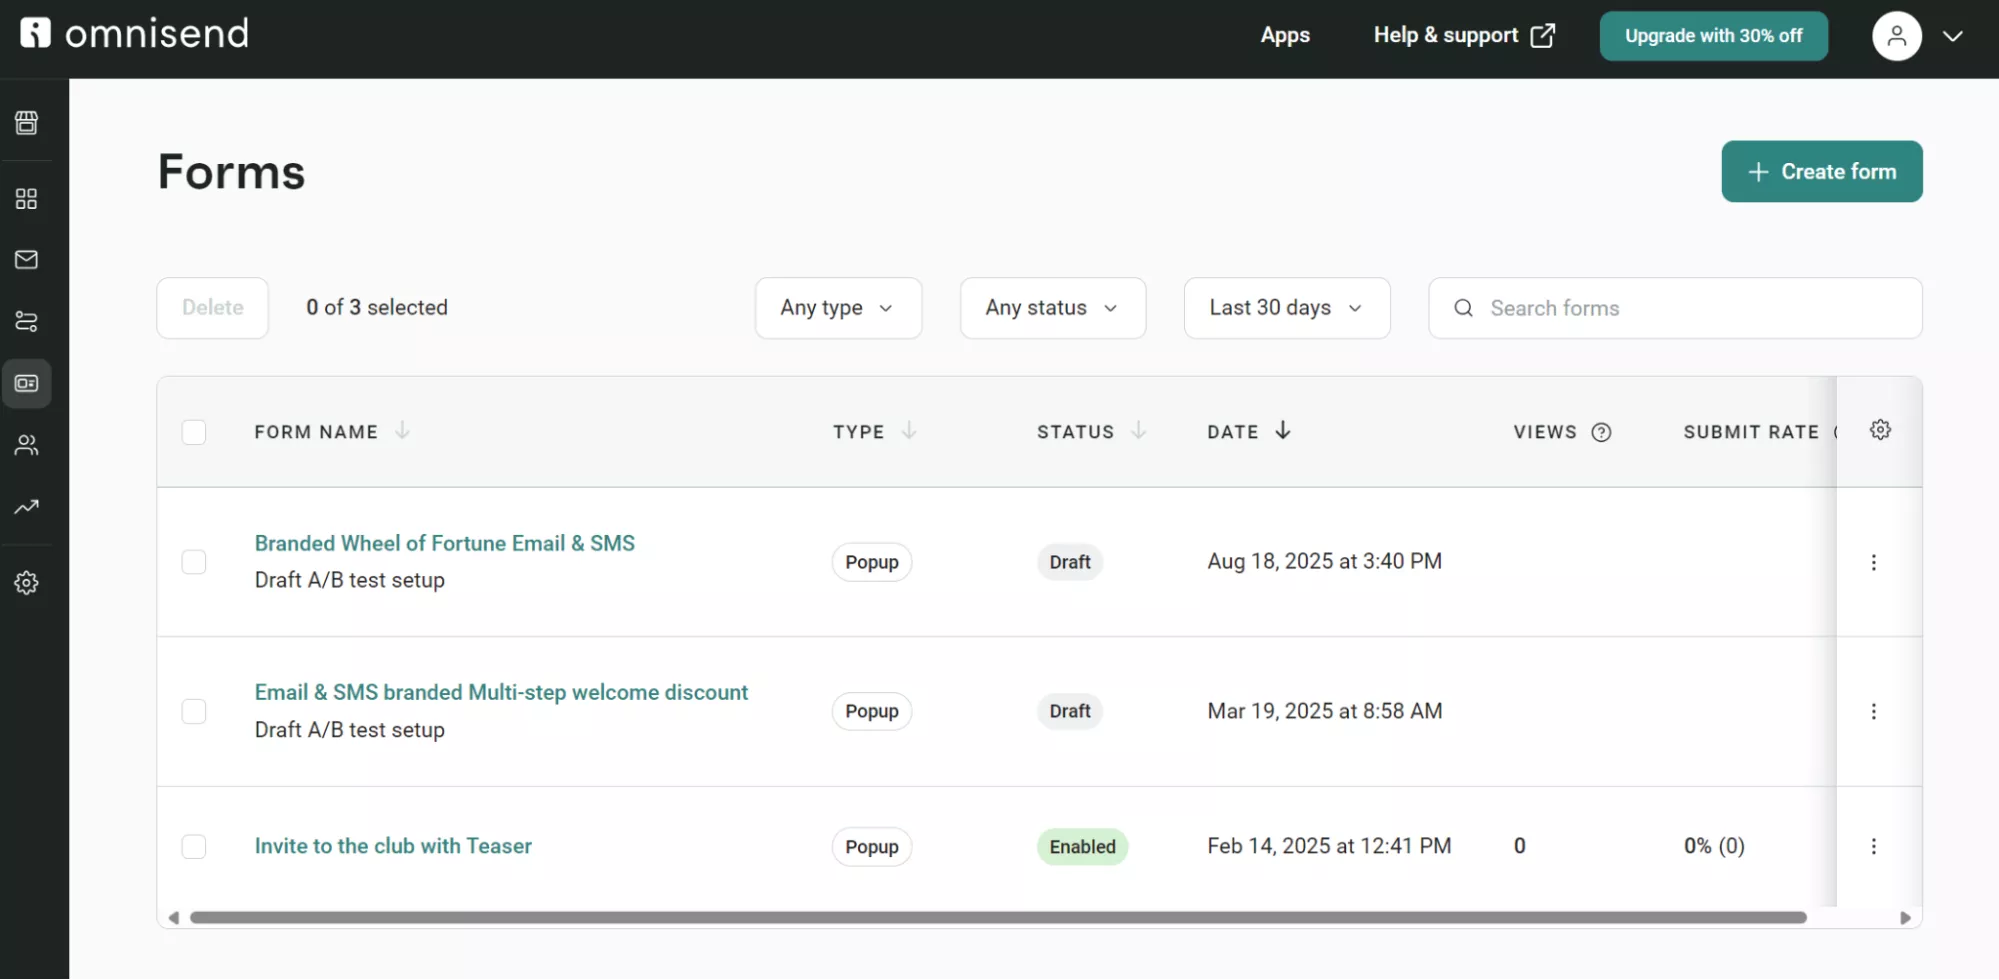
Use Undo/Redo buttons (limitless steps till web page reload) to refine your design. Click on Allow to make the popup dwell instantly or Save & Shut to avoid wasting as a draft — entry saved varieties by the Types dashboard to observe efficiency metrics:
Professional tip
Whereas these directions present Omnisend’s interface, most Shopify popup apps observe the identical workflow — set up the app, browse templates, customise design in a visible editor, configure show guidelines, then publish.
The buttons and menu names change between apps like Privy or OptiMonk, however you’ll discover comparable template libraries, drag-and-drop builders, and habits settings in every software.
Technique 2: Including popups with Shopify’s native Types app
Shopify provides built-in popup options by way of the Types app and the Types theme app embed. After including these to your theme, you possibly can create and allow popups.
The advantage of utilizing Shopify Types is that it’s utterly free, with no exterior accounts or APIs vital. Moreover, you don’t want to depart your Shopify admin panel to create popups.
Comply with these step-by-step directions to make use of Shopify’s native popups:
1. Set up the Types app and allow popup show
First, let’s entry Shopify Types:
- Out of your Shopify admin, go to Settings > Apps
- Click on Types to open the Types dashboard:
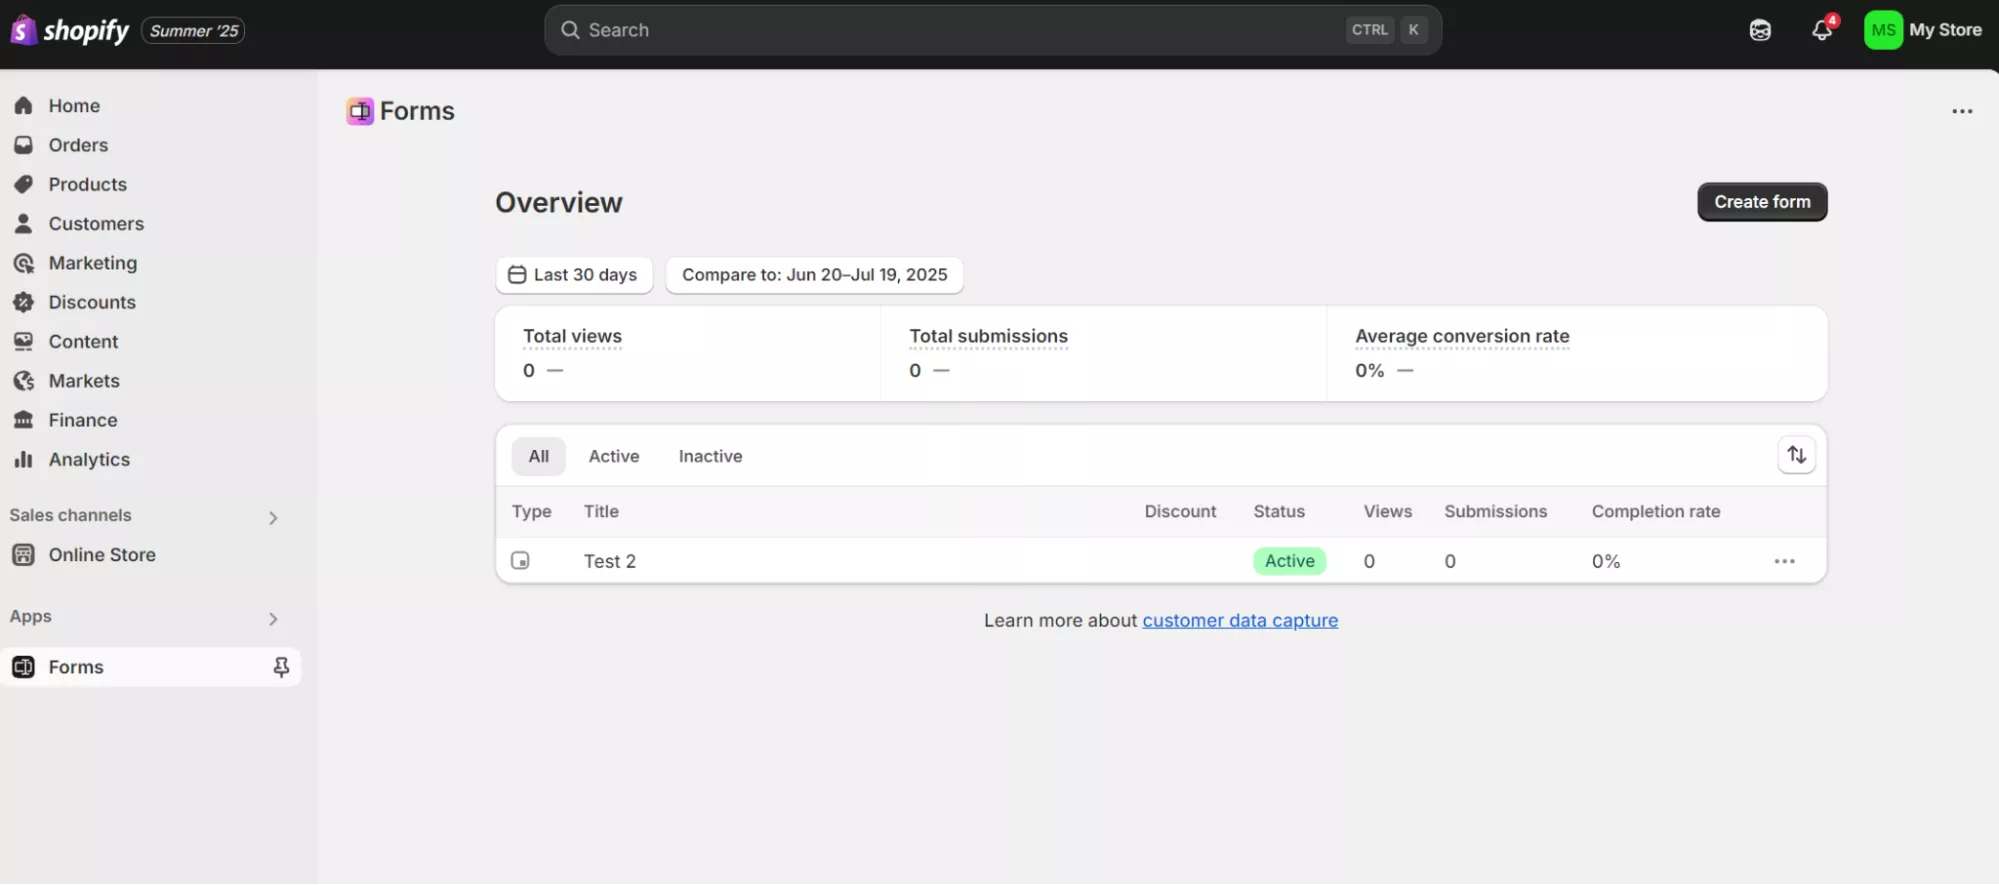
- Familiarize your self with the Types dashboard — it lists your varieties, supplies a standing, and shows analytics, equivalent to views and submissions
Subsequent, allow popup show in your retailer:
- Navigate to On-line Retailer > Themes:
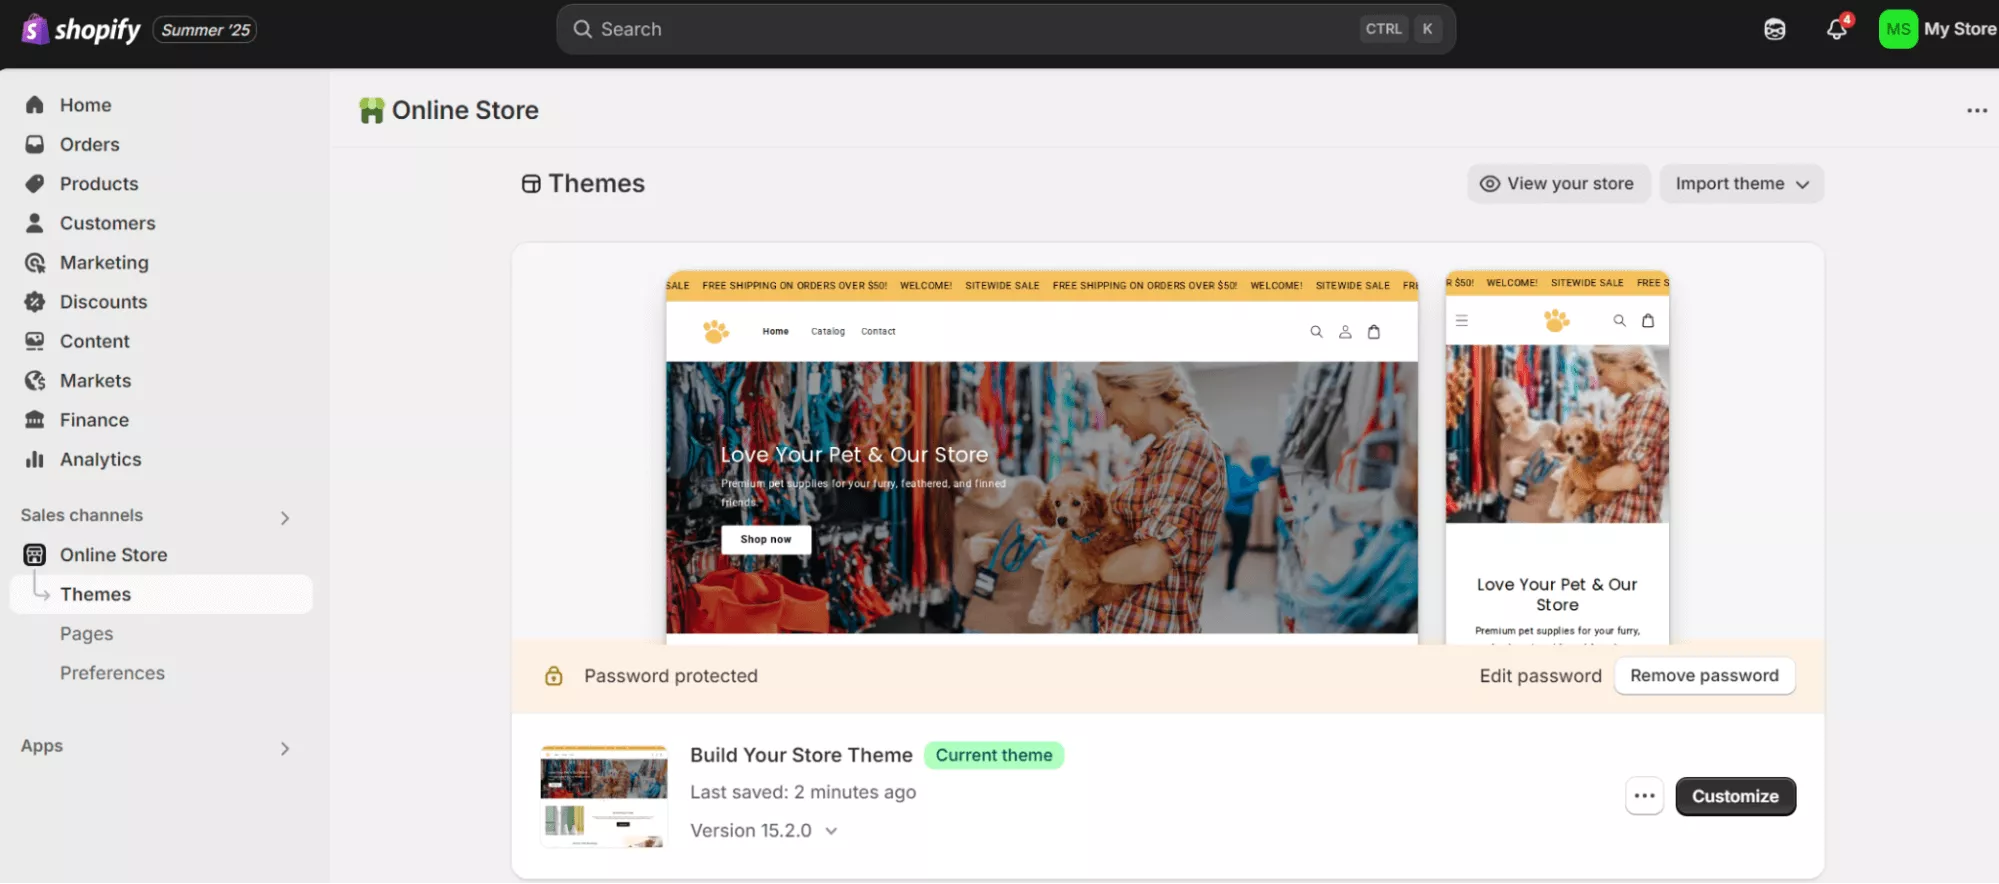
- Discover your lively theme and click on Customise
- Click on the App embeds icon within the theme editor sidebar:
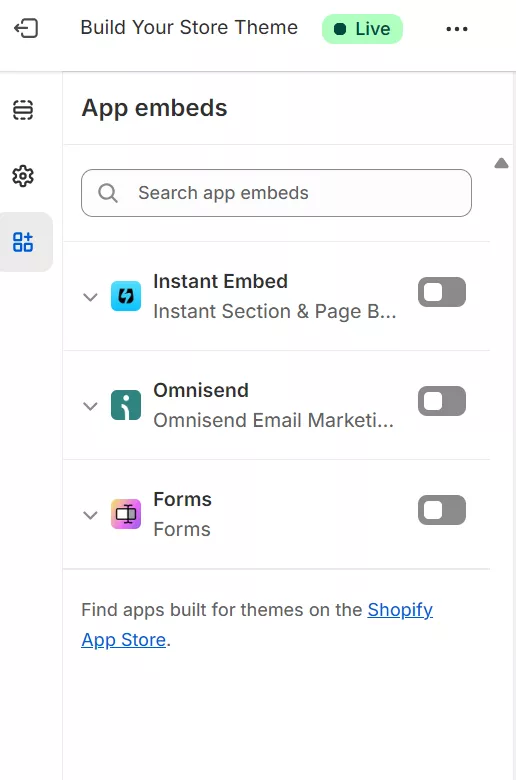
- Toggle Types to activate it
- Click on Save
With out activating the Types theme app embed, your popups received’t show even after creation.
2. Create your popup kind
From the Types app:
- Click on Create kind
- Choose Popup kind (not Inline kind):
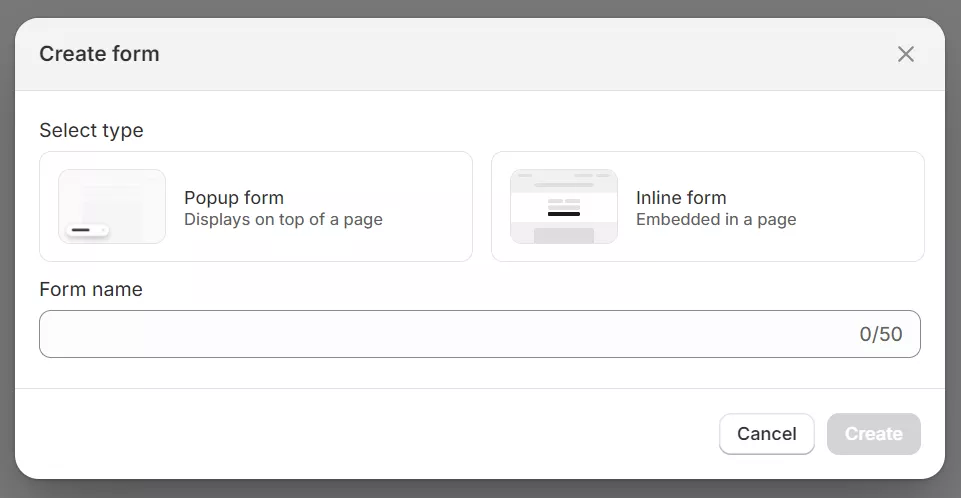
- Enter a kind title (e.g., “Publication Signup” or “10% Off Welcome”)
- Click on Create
Be aware: Your kind opens within the editor with Lively standing by default — it can show instantly based mostly in your settings.
3. Configure kind show mode
You’ll now see this dashboard:
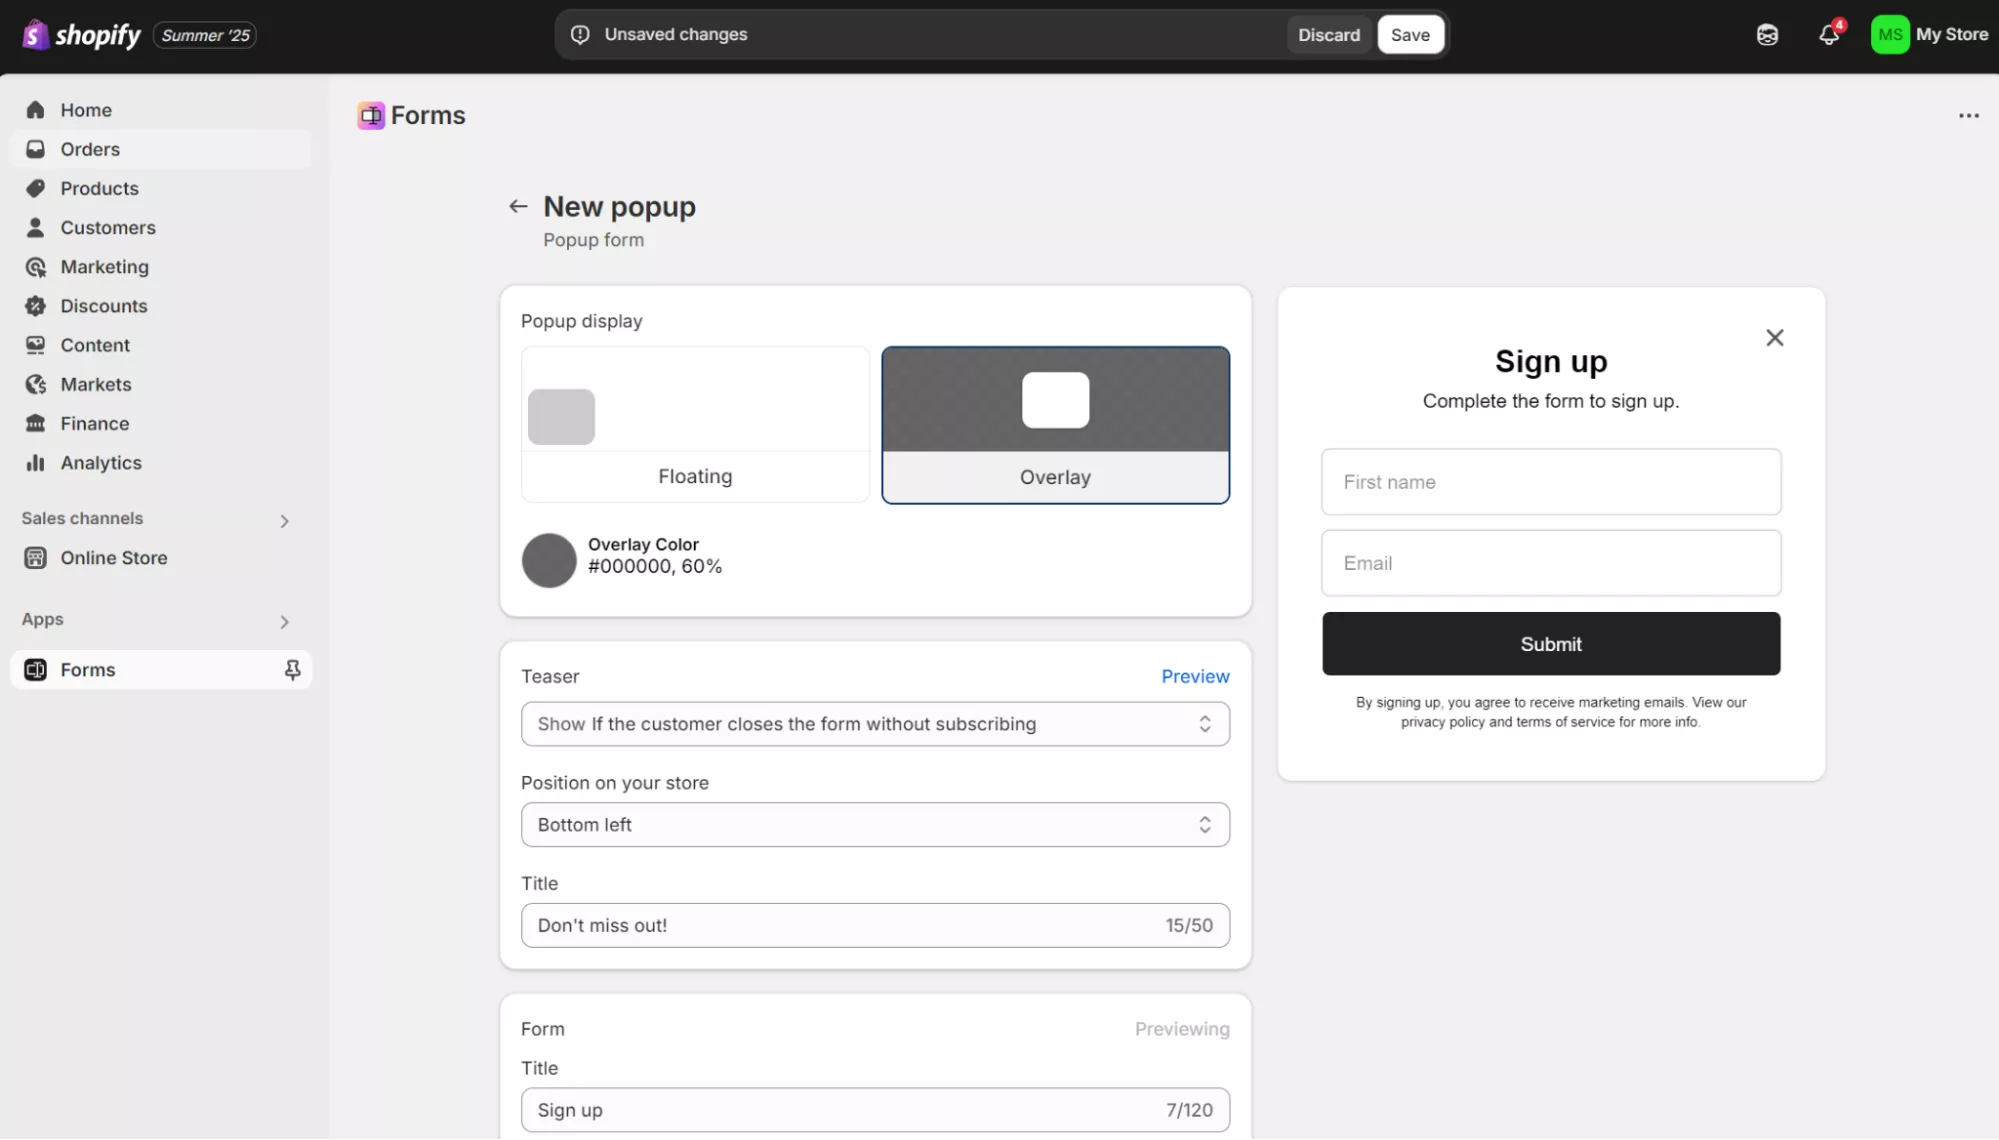
Select between two show choices:
- Floating — Kind seems as a nook popup with an elective teaser
- Overlay — Kind shows centered with a darkened background
For floating varieties, choose the place (bottom-left, bottom-right, and so forth.). Overlay varieties all the time seem centered.
4. Design your popup look
The Styling field supplies a number of settings for kind customization, as proven beneath:

Moreover, you possibly can edit your popup picture and teaser.
Styling settings:
- Colours — Set background, textual content, subject, button, and error message colours
- Kind fields — Select white or clear backgrounds
- Typography — Choose fonts for title and physique textual content from accessible choices
Picture settings (elective):
- Background picture — Full popup background with opacity management
- Picture left/proper — Facet placement beside kind fields
- Scale choices — Management how pictures match throughout the popup
Teaser settings (floating varieties solely):
- Present choices — Show earlier than kind, after shut, or by no means
- Place — Nook placement with elective rotation
- Title — Brief textual content to draw clicks
5. Set show triggers and focusing on
Shopify Types enables you to select on which gadgets and pages to point out your popup, plus set triggers to show on completely different web page views:
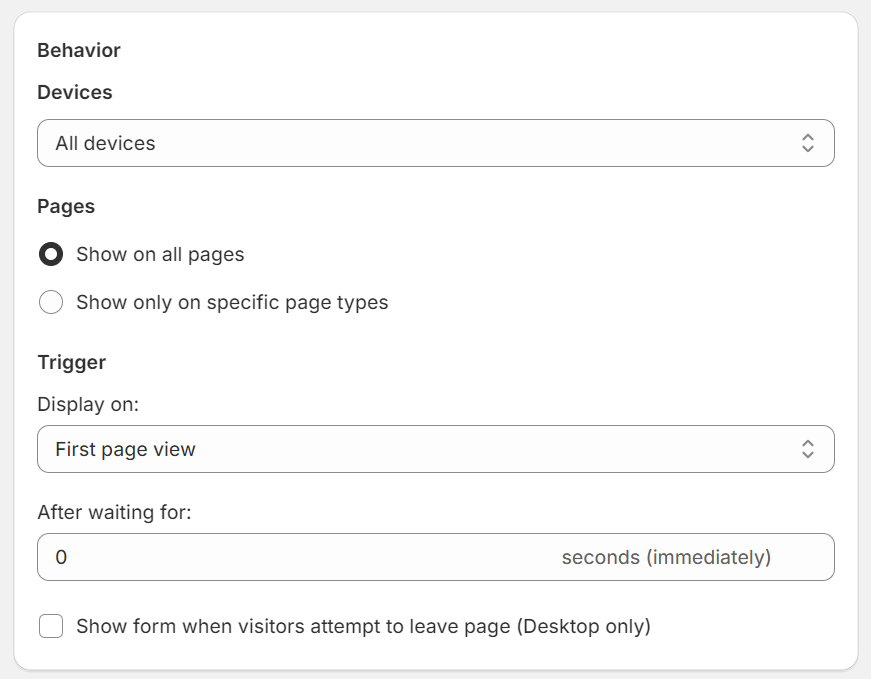
Set off choices:
- Web page view depend — Present on 1st, 2nd, or third web page view
- Time delay — Instantly or after specified seconds
- Exit intent — When the cursor strikes towards the tackle bar (desktop solely)
Visibility settings:
- Units — All gadgets, desktop solely, or cellular solely
- Pages — All pages or particular varieties (product, assortment, and so forth.)
Be aware: Shopify Types can not goal particular URLs or exclude sure pages, like checkout.
6. Add kind fields
Use the editor to customise fields:
- E-mail subject (required by default)
- Further fields like title, telephone, or {custom} questions
- Privateness consent checkboxes for compliance
- Success message after submission
To create announcement popups with out e-mail assortment, take away all kind fields and add solely textual content/pictures with a button.
7. Save and monitor
Click on Save to activate your popup:

New varieties are mechanically set to Lively standing and start displaying based mostly in your configured guidelines. Monitor efficiency within the Types app dashboard — you possibly can view submission counts and handle a number of varieties from one location.
Professional tip
Whereas Shopify Types handles primary popup wants, you’ll hit limitations shortly. No A/B testing means guessing what converts finest. No behavioral focusing on means displaying the identical provide to everybody.
Should you want options like cart worth triggers, buyer phase focusing on, or integration with SMS advertising and marketing, contemplate upgrading to a specialised app.
Technique 3: Guide code addition
Whereas Omnisend and Shopify Types are the most effective methods to simply add popups to your retailer, you are able to do it manually with code.
This selection is extra superior and requires coding information. It’s best to again up your theme information earlier than making any edits or adjustments.
Use handbook code whenever you want distinctive popup behaviors that apps can’t present — {custom} animations, particular JavaScript triggers, integration with proprietary methods, or full management over popup timing and styling.
Making a popup kind in HTML
HTML is the best manner so as to add a {custom} popup to your Shopify retailer. The shape beneath was created by us and examined with the W3Schools HTML software:
There’s loads occurring with this way to make it look the way in which it does. Right here’s the code (be at liberty to seize it and reuse it):
| {% schema %} { “title”: “Customized Popup”, “settings”: [] } {% endschema %} |
Copy textual content
Be aware: Including a popup to your Shopify retailer with handbook code works with any Shopify theme by enhancing the theme information. It’s best to all the time take a look at the code in a preview earlier than publishing it dwell to make sure it capabilities as supposed.
Including the HTML popup to Shopify
After you have your kind, you possibly can add it to Shopify with these steps:
- Out of your Shopify admin, navigate to On-line Retailer
- Click on on Themes
- Click on Customise
- Click on the three dots on the high of the editor and choose Edit code
- Beneath the Sections listing, click on Add a brand new part
- Title it custom-HTML
- Click on Completed
After including this code:
- Go to your theme.liquid file
- Add this line the place you need the popup to seem (usually simply earlier than the closing